Wanted to share another of my passions - Project SV650 "Cafe Fighter"

MartinLogan Audio Owners Forum

Help Support MartinLogan Audio Owners Forum:

This site may earn a commission from merchant affiliate links, including eBay, Amazon, and others.

c_morse

Well-known member
Joined
Feb 19, 2010
Messages
145
Reaction score
0
Location
Shaw AFB, SC
Hi y'all. I know this is a forum dedicated to Martin Logan and high end audio, but I also know that there's a large majority of folks on this site that appreciate nice automobiles and (maybe by a bit of a stretch) motorcycles.

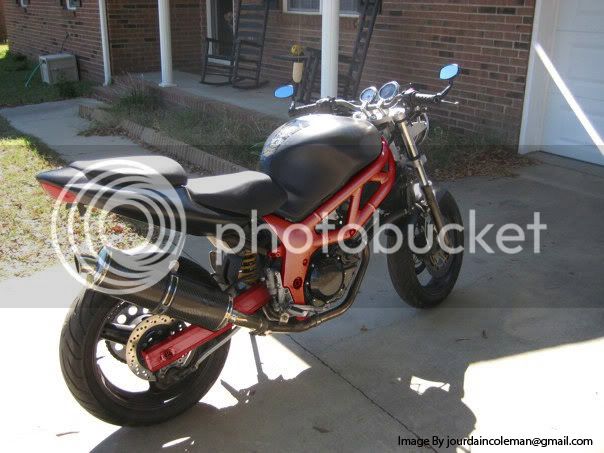
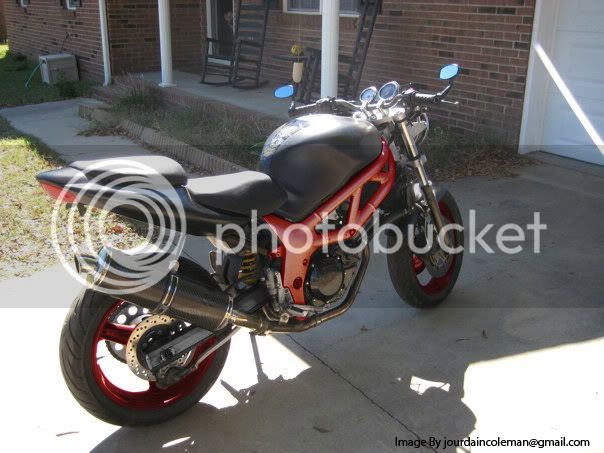
While this doesn't happen to be a Ducati or Aprilia or whatever, I am building this as a higher end bike, and have refined almost every part on the bike.

The following is my current build, as detailed on several other forums I frequent.

You'll probably see a lot talking about my injury in later posts. I recently crashed my 2007 Triumph Daytona 675. I suffered 3 fractured vertebra in my back, and she was totaled. I'm currently healing up nicely, and am about to pick up another 2007 Daytona 675 to replace her.

Hope you guys enjoy!

All comments and criticisms are welcome. Always looking for feedback to help refine my bike.
 
Last edited:
First and foremost, I'm copying this pretty much directly from another site I posted on, so if you see anything talking about "read on this site" or the like, it's referring to svrider.com and not here. Other than that, here we go:

Purchased this bike on 23 October 2010.

Previous owner had done a few things to it. This is the way it sat at time of purchase:

36153_1642713509032_1272672326_1751060_2645400_n.jpg

73125_1642713629035_1272672326_1751061_5567185_n.jpg

37196_1642714029045_1272672326_1751062_3396960_n.jpg

73382_1642714229050_1272672326_1751063_7213304_n.jpg

68721_1642714589059_1272672326_1751066_3103509_n.jpg


The most notable modifications already to it were as follows:

-All turn signals deleted
-Front stainless brake lines
-CNC Bar-end Mirrors
-Stage 1 Jet Kit
-Desnorkeled intake
-Scorpion Carbon Fiber Slip-On
-Custom made Carbon Fiber Kickstand
-Fender Delete
-Renthal Handlebars

Of course I couldn't wait to start modifying it, as subsequent posts will reveal.
 
Last edited:
First on the list was to get the turn signals back. I want the bike 100% functional, and also like the added security when riding that comes with actually having functioning signals.

Instead of adding in rear signals I found a thread detailing the install of a trailer lighting control that can be picked up from any auto parts store. After picking up the part in town, I came home and broke out my soldering iron, heat shrink, etc. This was the result:

IMG_2146.jpg

IMG_2147.jpg


Also took the time that day to rearrange my garage a little to fit this new toy in there. Now she's all nestled right in front of my mint 1990 300ZX:

IMG_2148.jpg

IMG_2149.jpg
 
Last edited:
Now that I had fully functioning turn signals again, it was on to a bit of actual modification. Read about the rideitmoto adjustable levers on this site, so ordered up a set. Got the shorties, and in the gold anodized finish. Very nice units, I must say. No more "carbon look" controls (I can't stand fake carbon). Anyway, a couple pics of the old fake carbon units, and the new ones installed:

IMG_2154.jpg

IMG_2159.jpg


Also dropped a few bucks on some billet aluminum foot pegs, and a billet aluminum shifter. Will be getting full rearsets hopefully before the end of winter, but these are good enough for the remainder of the riding season:

IMG_2155.jpg


The final thing to install was a clear Lockhart Philips brake light. Picked it up for ~$20 off eBay. It'll suffice until I upgrade to a full LED unit.

IMG_2157.jpg

IMG_2160.jpg
 
Received my DDM Tuning Hi/Lo HID Kit in the mail this week, but held off a bit on installing it. I had some left over wiring I wanted deleted from the harness, and wanted to full integrate the HID kit into the factory harness. So, during the week I began the tear down of the bike. Took a single night to get it ripped apart enough to get the entire wiring harness out:

IMG_2162.jpg

IMG_2163.jpg

IMG_2164.jpg
 
Two nights of tedious labor to include soldering, wire tracing, and re-wrapping the entire harness, I had this what's below. Everything is now integrated, and the turn signals have actual connectors like I'd wanted from the start:

IMG_2167.jpg


Also got the HID bulb installed into the headlight housing. Ended up having to extend the HID wires from the bulb by about 10 inches so they'd reach into and connect inside the frame, but more on that in just a minute:

IMG_2165.jpg

IMG_2166.jpg


I ended up mounting the HID ballast box and ignitor inside the lefthand side of the frame, directly underneath the air box. Here you can see the location, as well as final HID wiring that I came up with. You'll notice the extended bulb wiring that I routed back and into the frame where it connects to the Ignitor:

IMG_2168.jpg

IMG_2169.jpg
 
Took me a few hours of work, but I got the whole bike back together in a single night. Here's the nearly finished result:

IMG_2170.jpg


In this picture, you can see the trailer adapter as well as the new HID control box. I chose to mount this in the rear section as it's close to the battery and I also had a ton of room. I routed the High and Low beam wires to this location and deleted the original headlight ground from the front of the harness, while tying a new ground for the HID's into the rear section of the harness:

IMG_2171.jpg


This is the pile of wiring/old tape/old zip ties/etc I ended up with at the end of the project:

IMG_2172.jpg


First turn of the key/startup and everything works perfect! Not a single bug to work out. Here's the HID in all its glory:

IMG_2173.jpg


Also, not pictured is the battery tender wiring harness I installed.
 
Update time again. Here goes.

IMG_2177.jpg

Previous owner installed that chrome chain cover. Just not my style. Bought a stock one and replaced.

IMG_2178.jpg

Put the stock kickstand back on as well.

IMG_2179.jpg

Previous owner had installed this carbon fiber kickstand. It's nice, but hard to kick down and not near as stable. Also stands the bike up too much. Not sure what I'm going to do with it (if anything) yet.

IMG_2182.jpg

"New" used K&N Filter. Very nicely desnorkeled. Old filter on the right was very poorly desnorkeled.

IMG_2185.jpg

And the new K&N in the bike.
 
IMG_2186.jpg

New headlight bucket arrived. You can see the old one in the picture had a piece of metal riveted to it to hold it together. No good.

IMG_2187.jpg

Front end ripped apart for some fun. :D
 
So, I decided to go with clip-ons. Bought a set of Vortex units which are very nice I think. I went with an S Upper Triple to clean things up quite a bit.

I'm planning on adding an Acewell 2853 Gauge down the road a bit, but for now I am keeping the stock cluster. This presented a small problem in that there are no provisions underneath the S upper for the stock naked cluster to mount. Easy enough to fix though with a couple of small aluminum strips and a trip to Lowes for some new hardware.

Here's what I came up with:

IMG_2188.jpg

The extension pieces. If anyone is curious, the distance from the naked holes to the holes on the underside of the triple is 1.25". I cut the strips 2" long, and then centered a hole 3/8" from each end. This puts the holes at a nice distance for a good snug fit of the gauge cluster to the new upper triple.

IMG_2192.jpg

The parts after a couple coats of primer and paint, and baking to cure.

IMG_2193.jpg

How everything looks underneath. I used Allen head bolts with lockwashers to mount into the S upper, the bolt size is M6x1.25x12.

IMG_2194.jpg

And how it looks from the top. Not too shabby.

The headlight brackets were the next issue. I'd seen those kits on eBay for $40 shipped that contained four t-bolt clamps sized for 41mm forks, but I'm really not about to pay that for some clamps. So I used my handy dandy measuring tape and came up with a fork size just a hair under 1.5" diameter. A quick visit to www.siliconeintakes.com and I had four 1.5" stainless t-bolt clamps shipped to my door for $16. Definitely a bit better of a deal for the same thing!

Anyway, here's the result:

IMG_2190.jpg

Keep in mind that I'd already modified the headlight brackets to hold my turn signal, so that was a non-issue for me. I did have to use my dremel with a cutoff wheels to shorten the length of the bolts post-install, as I didn't like how long they were sticking out. I turned the triples lock to lock, and the long bolts don't interfere with a thing, so that's just personal preference.
 
Now it was time for the clip-ons. Went with Vortex 7* angle units. Very nice.

IMG_2191.jpg

The beginning of it all.

IMG_2195.jpg

After getting all the controls on. I installed an R6 throttle tube as well, just didn't think to take a picture of it. Easy enough to do, and the adjustments for the cables were pretty easy.

Also set my bar-end mirrors a little further forward than the previous owner had had them. This should give me a bit easier adjustability than what they had. Definitely needing a set of Driven D3 grips now though.

I am also going to have to order some shorter brake lines, as the ones on there now just have too much slack since I moved the bars about 4" down.

IMG_2196.jpg

A view from back toward the riding position. I tried these out, and it's really not near as uncomfy as I'd heard it was going to be. Feels very positive to me.

IMG_2197.jpg

Also took the time today to paint a few items on the bike. The chrome gauge housings are now matte black, as is the headlight housing and chrome trim ring. This looks just so much better to me.
 
Finally, a few shots from around the bike. I'm waiting on my complete lock set to come tomorrow, so I have to wait until then to take a ride. :(

IMG_2200.jpg


IMG_2201.jpg


IMG_2202.jpg


IMG_2203.jpg
 
163290_1762838952093_1272672326_2015940_5452536_n.jpg

Tank and Plastics removed for paint. Going Matte Black on it all.

33797_1762839272101_1272672326_2015941_5296677_n.jpg

Next time I take a picture of this tank, it won't have truck bed liner on it.

168535_1762839432105_1272672326_2015943_6517948_n.jpg

Start of the teardown.

164752_1762839712112_1272672326_2015945_2006775_n.jpg

Bike as it sits now. You can see the new gold Driven D3 grips I installed as well.
 
Couple of more pictures. Got the bike ripped down some more. Sorry for the fuzziness of the first one.

166598_1767584350725_1272672326_2027292_7672459_n.jpg


169039_1767584630732_1272672326_2027293_7724891_n.jpg
 
Got a little bit more done. Temporarily installed the ZX6R rear adjustable shock as I sold the stock one. Also got the wiring harness completely removed. Removed the front brake calipers and also the front and rear spark plug wires/coils.

Moving right on along! Here's a shot of it from tonight.

168650_1797314773967_1272672326_2084202_4057031_n.jpg
 
Got more done.

All controls are off.
Chain is off.
Carbs are off.
All brakes are off.
Exhaust is off.

I need to drain the oil and coolant this weekend, then drop the motor. Once that's done I can finish disassembling the frame/swing arm/forks for powder coating. Getting close to complete break down and should be starting reassembly with fresh parts within a month.

180131_1806034791962_1272672326_2098909_1051979_n.jpg

167869_1806034911965_1272672326_2098910_436417_n.jpg
 
Another awesome day of work. And finally glad to say the bike is completely disassembled. All I have left to do is to modify the subframe and clean it up, then everything can go to powdercoat.

Decided to go with the Lollipop Red on the frame and swingarm, subframe and front forks will be matte black. Triples will be gloss black. All the other small pieces will be going matte black. Brake calipers will be gold. I'm going to try to paint the wheels gunmetal, and if they don't turn out like I want, I'll go ahead and have them powdercoated as well. We'll see how that goes.

Anyway, the pictures:

180804_1809191470877_1272672326_2106124_4788328_n.jpg

All the parts strewn through the garage.

181844_1809191710883_1272672326_2106126_3026399_n.jpg

Frame and swingarm, completely stripped and ready for coating.

180408_1809191870887_1272672326_2106127_4235_n.jpg

You can see all the parts going to powdercoat toward the bottom of the picture with labels on them.

181803_1809191950889_1272672326_2106128_3800203_n.jpg

Engine hanging out, waiting to go back into the bike.

167263_1809192230896_1272672326_2106129_697667_n.jpg

Massive pile of parts.
 
Alright,

Got a guy on another site to photoshop a bit for me. Below are the two options. The first option has black fork legs, the red frame and swingarm, and black wheels. The second option has black fork legs, red frame, black swingarm, and red wheels.

after
redframeswingerblackforkleg.jpg


after
redframeswingerblackforkleg2.jpg


I'm personally leaning toward the second, but curious what others think.
 
Got a little more work done. Subframe is now modified and ready for powdercoating.

182204_1817560720103_1272672326_2121537_561074_n.jpg

Stock subframe.

180911_1817560840106_1272672326_2121538_6023525_n.jpg

All the bits that were removed.

179889_1817561880132_1272672326_2121546_8025773_n.jpg

Deleted the left side passenger foot peg mount, tie down bars, etc.

168950_1817561960134_1272672326_2121547_4263672_n.jpg

Deleted the stock rear brake reservoir mount.

181540_1817562120138_1272672326_2121548_6211225_n.jpg

Deleted the rear reservoir hose guide.
 
And now for some goodies - new parts for the bike!

181902_1817560960109_1272672326_2121539_53982_n.jpg

Corbin seat.

181686_1817561160114_1272672326_2121540_4607273_n.jpg

Delkevic 200mm Mini Slash-cut Carbon Fiber slip-on Exhaust

168076_1817561320118_1272672326_2121541_6823733_n.jpg

Acewell 2853 Digital Gauge.

168902_1817561600125_1272672326_2121543_4580692_n.jpg

ZX6R Rear Adjustable Shock

181713_1817561680127_1272672326_2121544_7726510_n.jpg

MDA-123 Li-Po Battery. Less than half the size and weight of the stock battery, with the same voltage and CCA.

That's it for now. All the parts getting black powder are going out this week. Need to order the red powder and get the tires off the wheels, then will send in the other parts.
 
Back
Top